

Share on Social Media
The subject of brake spacing on a SawStop table saw seems to be somewhat confusing to people, no matter how long they have been using the saw. I’m hoping to clear up some of the mystery once and for all.
What exactly is brake spacing?
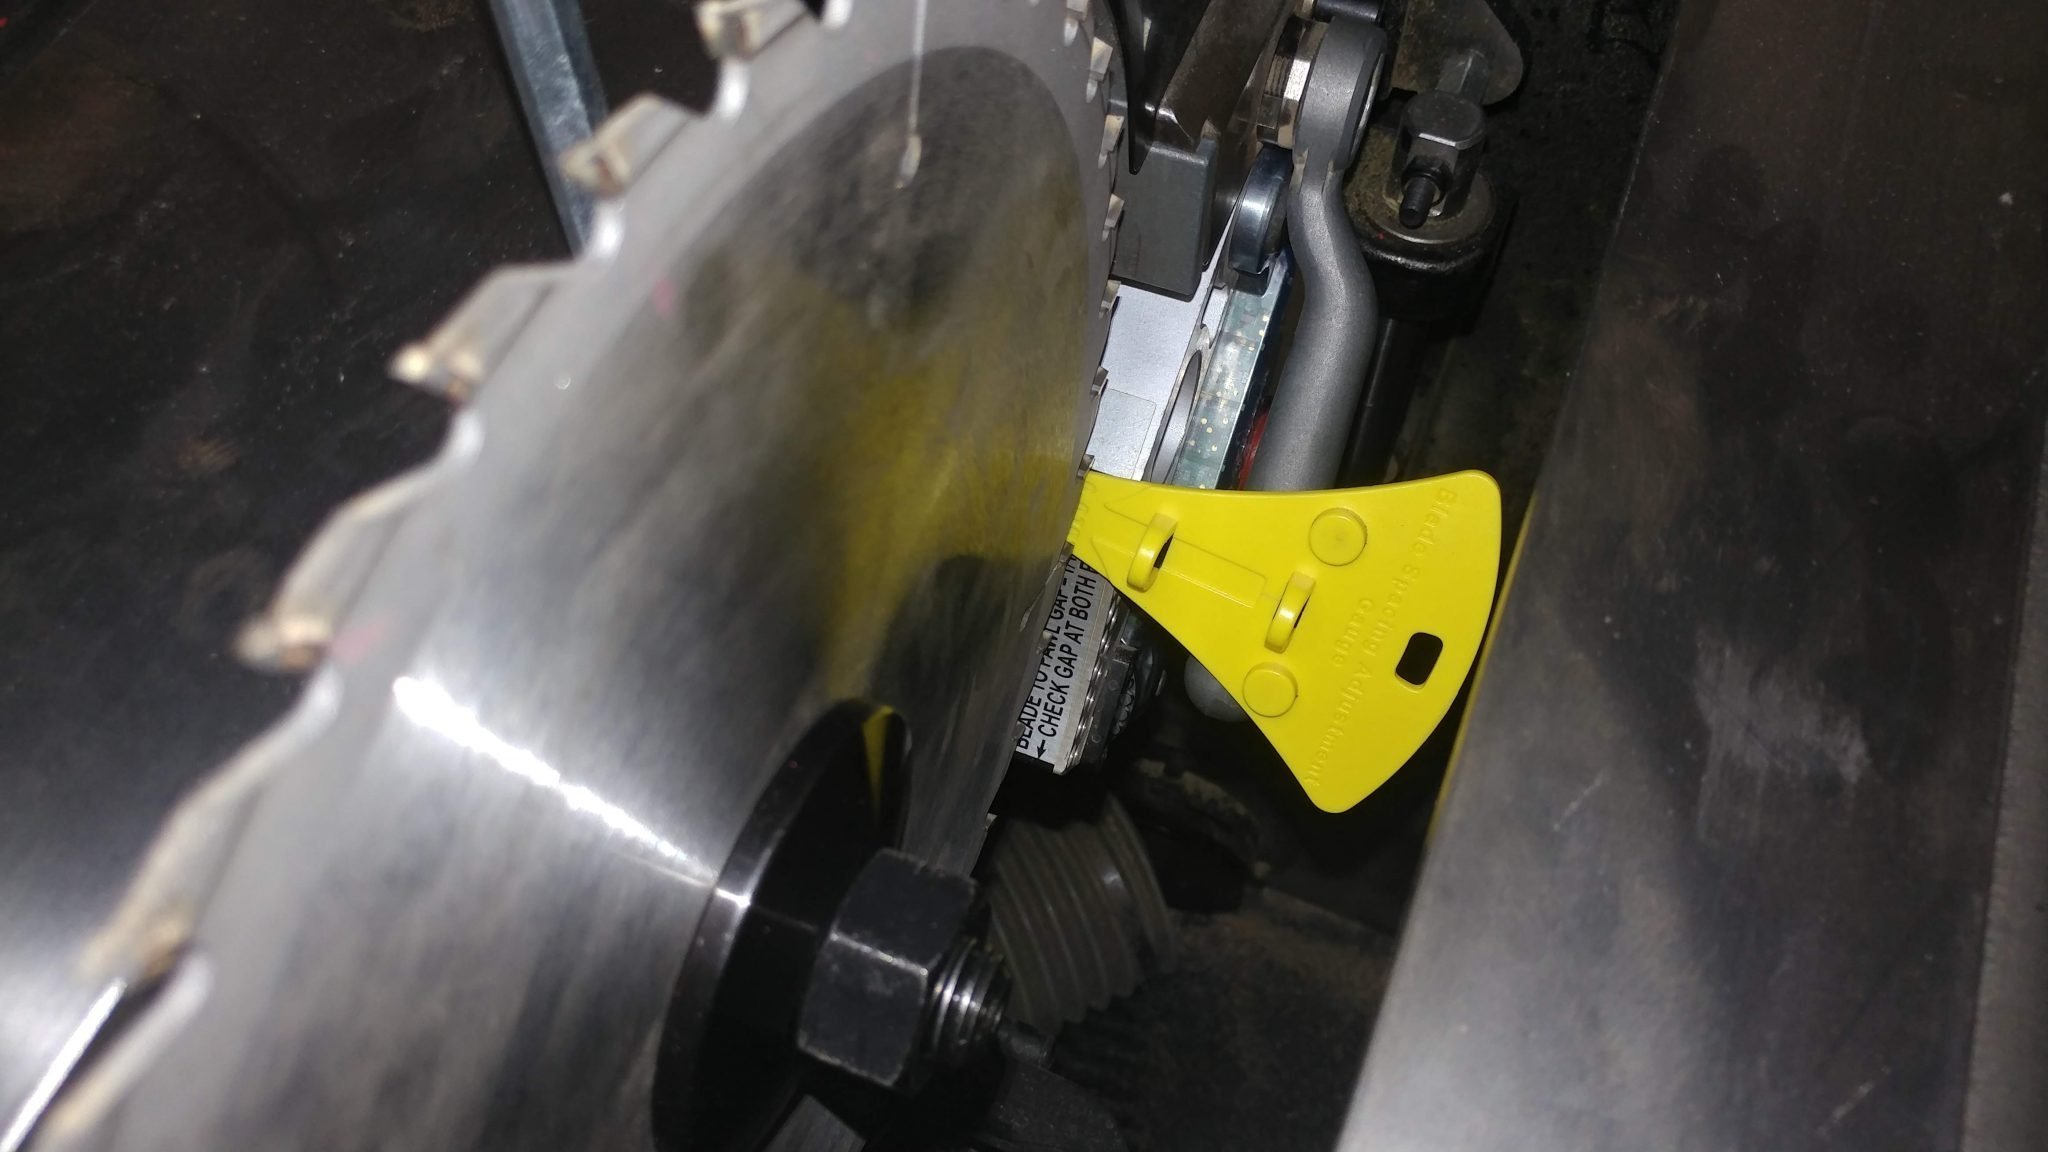
Brake spacing is literally the space between the brake cartridge and the blade as shown below.

Why is it important?
The saw blade has 5 volts of electrical current flowing through the blade and the brake is sending out a radio signal to monitor the level of that current. If something conductive, such as a finger, touches the blade it will absorb some of the current and like a sponge in a glass of water, the current level will drop.
The brake needs to be close enough to the blade in at least one location in order for it to successfully monitor the electrical current flowing through the blade. You’ll notice that the aluminum brake pawl is curved to follow the circumference of the blade. It’s very rare that this curve will follow the shape of the blade perfectly.
What happens if the brake is too far from the blade?
If the gap between the blade and brake is too great, the brake will not be able to see the electrical current flowing through the blade. This results in an error message consisting of a solid red light and a slow (about once per second) flashing green light. You will be unable to start the saw until you clear the error message by bringing the brake closer to the blade.
What happens if the brake is too close to the blade?
This is what you really want to avoid. If the brake is too close to the blade then you run the risk of a high tooth on the blade making contact with the aluminum brake pawl and activating the brake immediately at paddle pull.
How do I adjust the spacing?
The brake spacing is adjusted with an 8mm allen bolt to the left of the blade. It should be bright yellow and hard to miss.
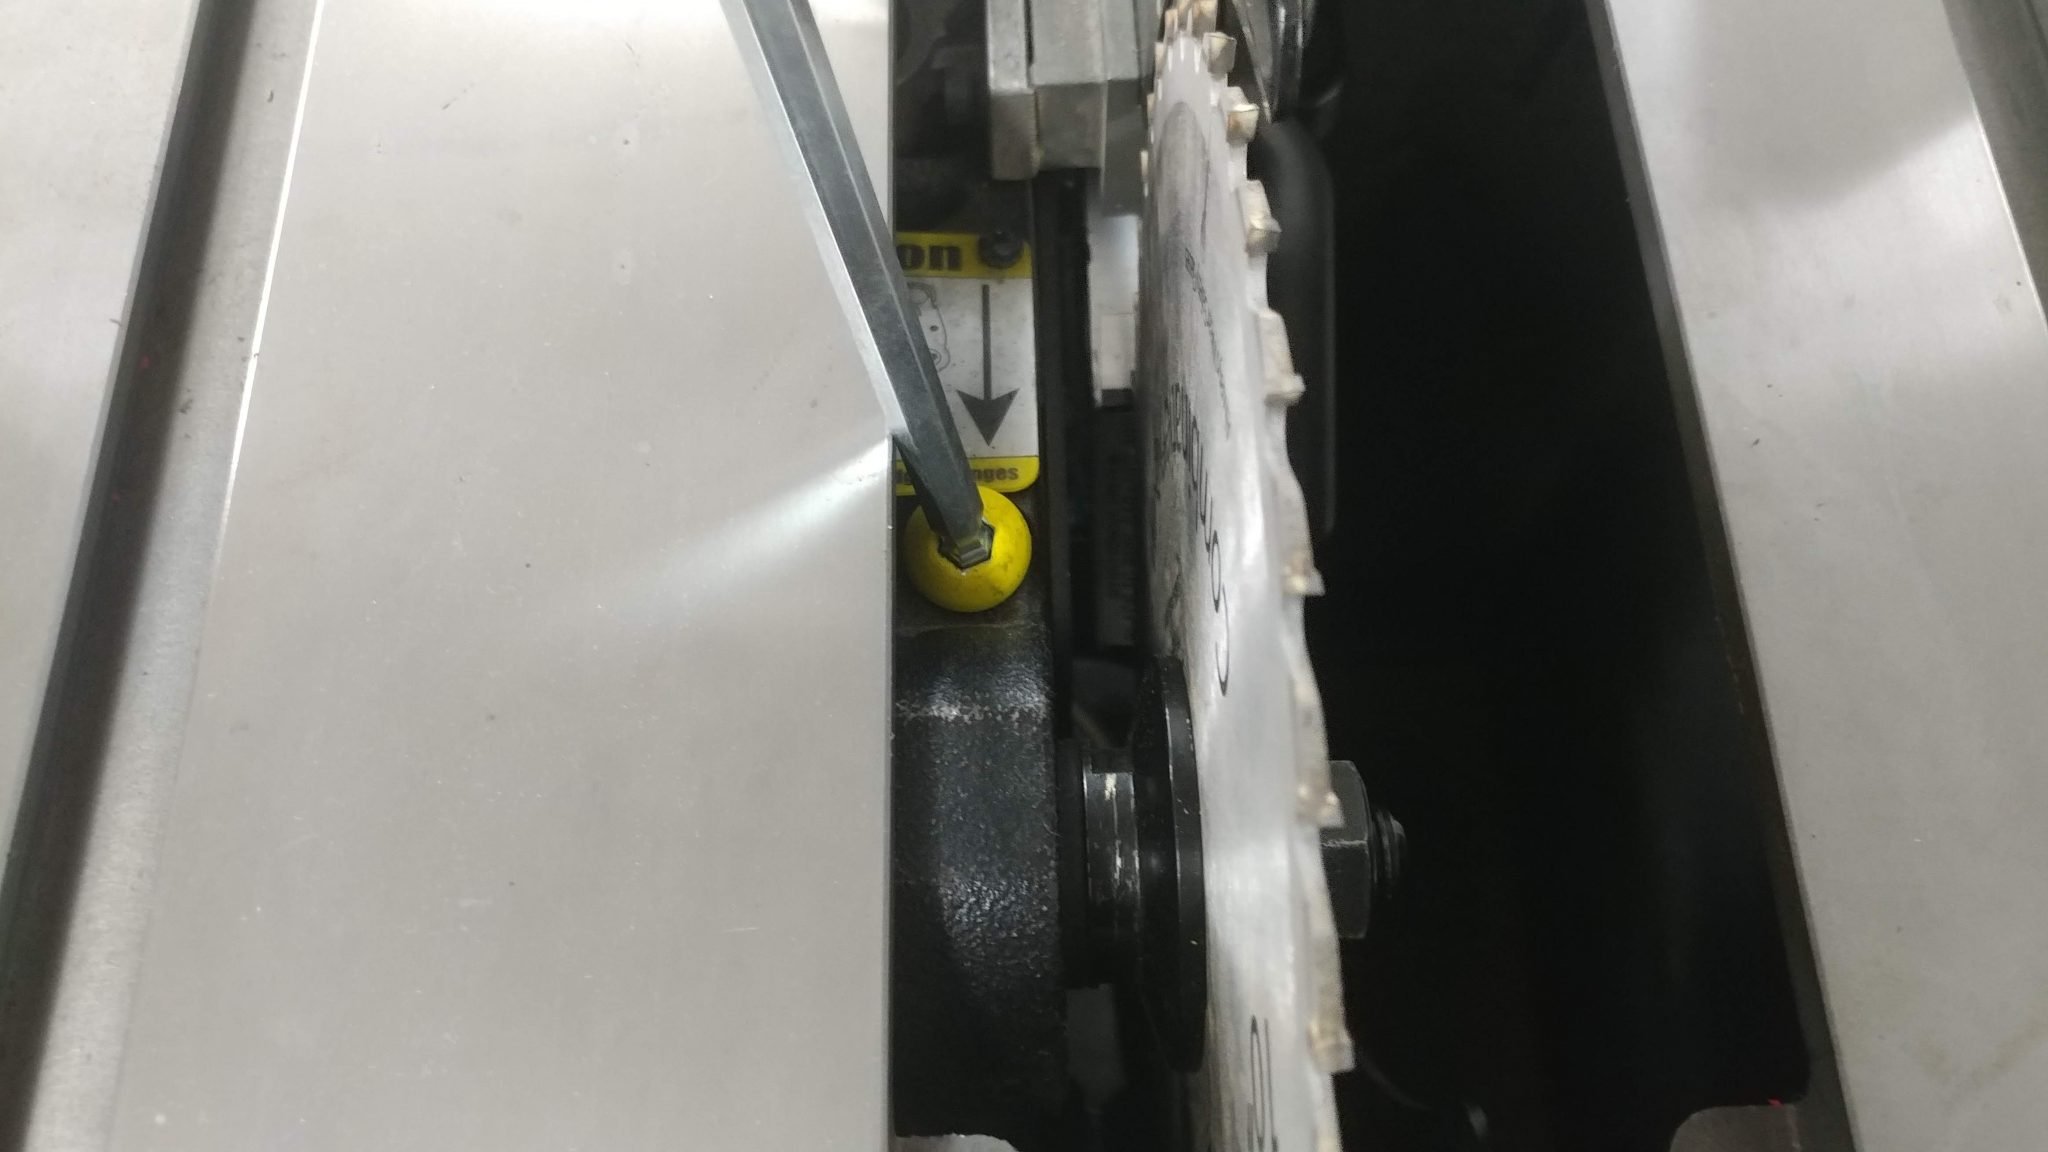
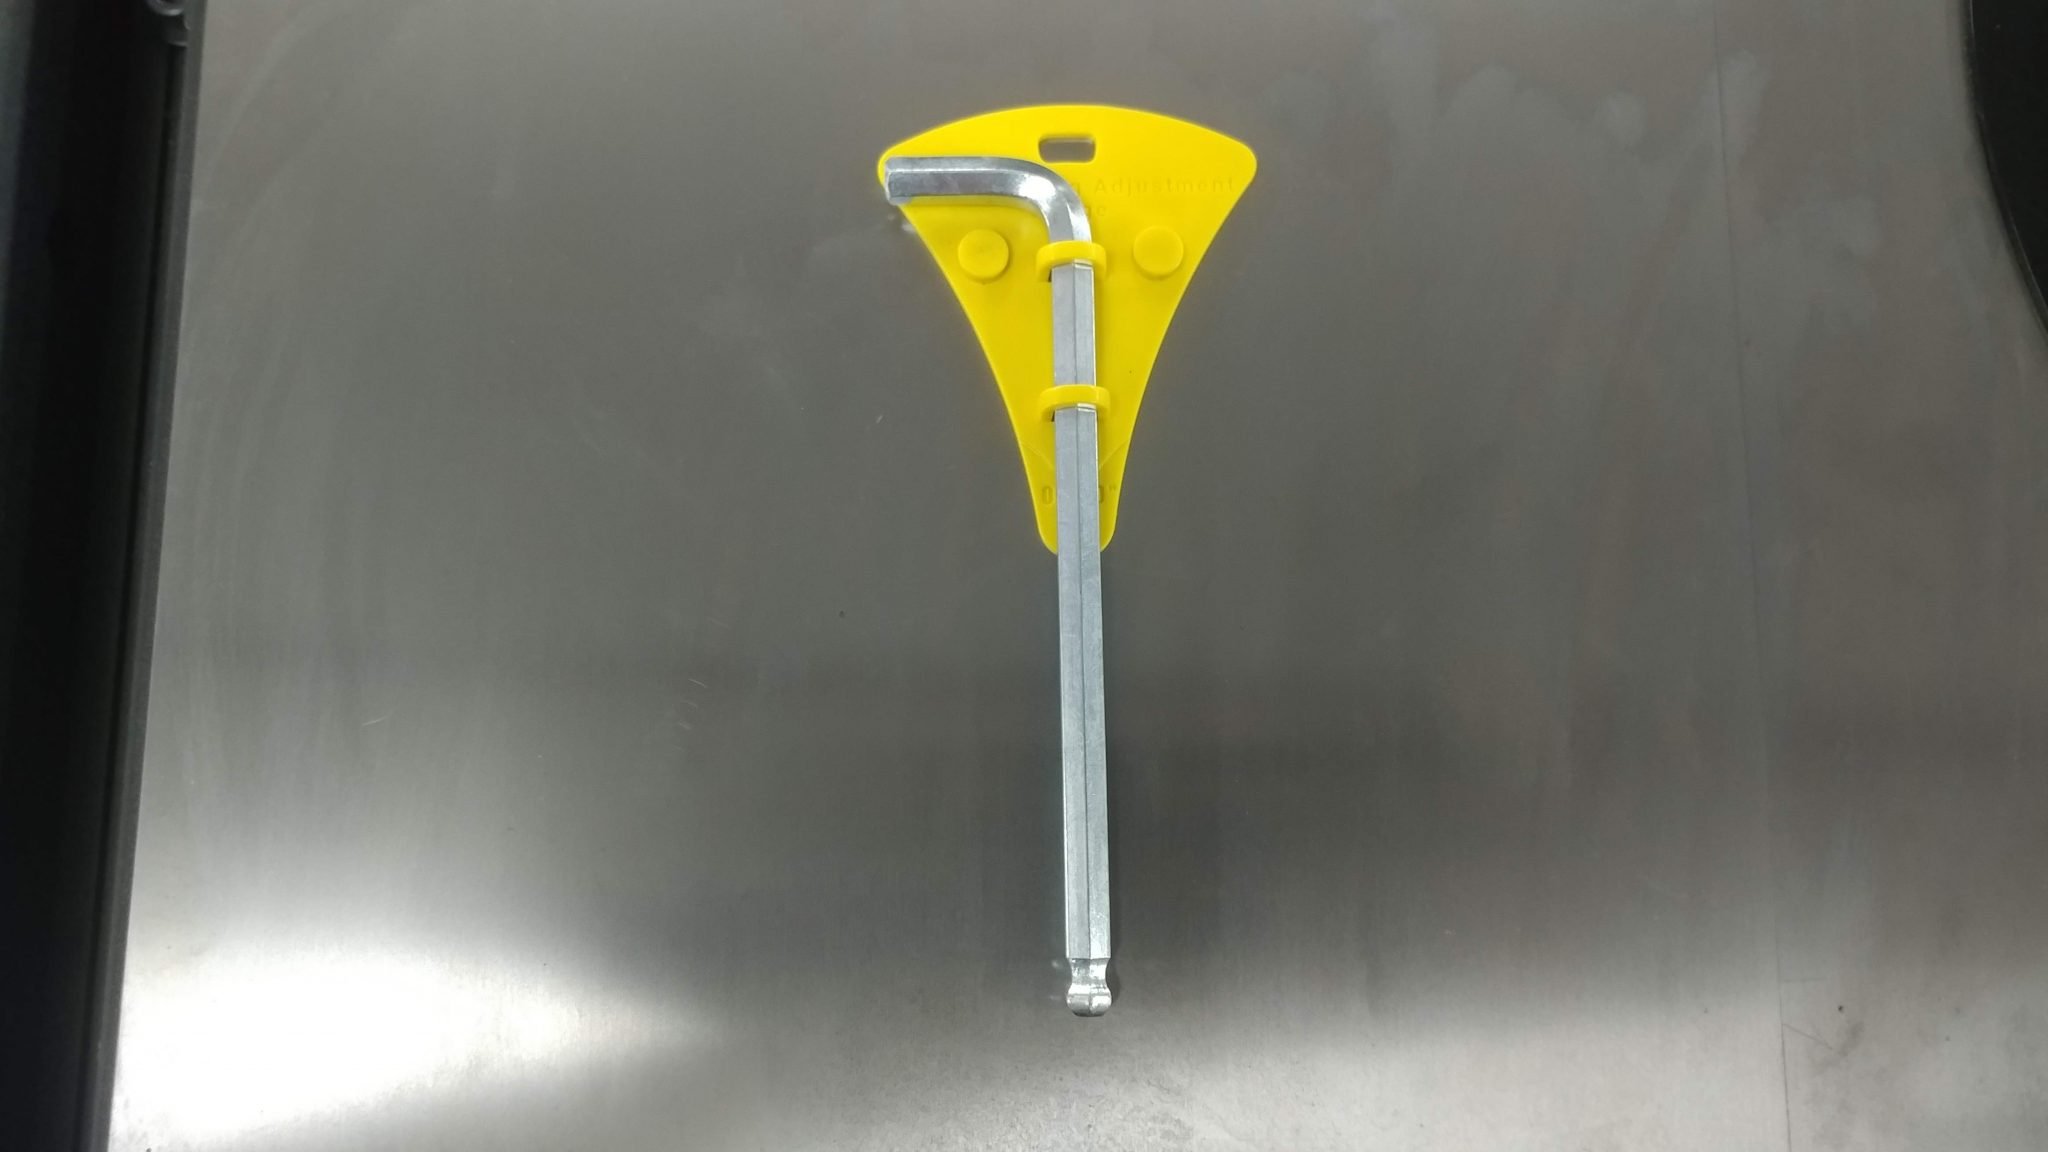
You use a yellow feeler gauge that is provided with your saw to check the gap spacing. If you can’t find yours, look on the side of your saw. It has magnets on the back so most people just stick it to the side of the saw.
The gauge is .070″ thick and should be inserted between the blade and brake at the point where they are closest. This will most likely be at the top of the curved aluminum.
You should be able to rotate the blade and have the teeth just barely touch the yellow gauge.
If you have misplaced your yellow gauge, you can use a US nickel or even the brass bypass keys that should be on the right side of your switchbox.
Any tips?
The gap doesn’t need to be exact. There is a window that it needs to be within for the system to work. You can have the gap one of three ways: perfect; too big; or too small. If you can’t have it perfect, err on the side of it being too big. If the gap is too big then the worst that will happen is you’ll get the error message. If it’s too close, you might inadvertently activate the brake at paddle pull.
After some trial and error I happened to find the perfect combination of blades where if I set the gap to its biggest the blade is still close enough to the brake to work yet never too close. As a result, I haven’t adjusted or even checked the brake to blade spacing in over two and a half years. If you’re curious, these are the blades I alternate between:
I can’t clear the error message!
If you are getting the solid red and slow green error message and you can’t clear it no matter how close you bring the brake, there may be something interfering with the signal.
If you have changed the height of the riving knife or blade guard on your saw then the clamp may be too low and interfering with the blade signal. Try installing the riving knife to see if the error goes away. Obviously, if you are trying to make dadoes with an 8″ blade then you can’t make the cut with the riving knife installed, but this is just a troubleshooting step. If the error goes away then we found the problem. You need to raise your riving knife clamp up a little or put a piece of cardboard in the clamp to hold it shut rather than hang loose.
Did I miss anything?
I hope I covered all of the important info related to brake to blade spacing. If I missed something or you have any questions, please leave a comment below and I’ll address it either with a response in the comments or by updating this article.
Also, be sure to join us on the SawStop Users’ Group on Facebook.
It’s a great idea for you to have these Tutorials Trent thanks for offering them.
Jim Brokenbourgh
I’m headed to gym right now to blow off some steam because I just spent 2.5-3 hours roughly trying to get a dado brake to work with no luck.
Only reason I need the dado brake right now is so I can cut a slot in one of the removable inserts in the Infinity zero clearance insert. I need to make a 45 cut in one of the blanks.
So I slapped on the dado brake and a dewalt 8” dado single blade and adjusted the brake so it scraped a nickel on the top of the brake where it’s closer. I got it adjusted, flipped the switch and got the error code. I kept adjusting in and out with no luck. I then read that for some reason it might be the riving knife housing, that it might be too low. I loosened the riving knife housing, flipped the switch and got the green light. Cool! I then cranked it to 45 degrees to make my cut and error code came back on
I then spent probably 45min-hour moving the brake in and out and moving the riving knife housing up and down without any luck at all. I unplugged the saw. Plugged it back in. Nothing.
I don’t know what to do. I’d like to be able to use a dado stack.
5hp CB 52” single phase by the way. Not sure what brake model it is but the old 9 pin I think, certainly not the new one .
Any tips?
I’m not sure if I turn the saw on, get the error code if it will go away if I move the brake in and out AND the riving knife housing up and down. Kind of at a loss.
Tomorrow I’m going to throughly blow out the area of sawdust and see if I can mess around with it. I’m also going to give sawstop a call and see what they say.
It’s also frustrating that Infinity tools and the guy that created the zero clearance insert, they made it hard to do the initial cut for a 45 degree insert. A 10” blade doesn’t fit before the slot is cut. I’m not sure what they were thinking. They should have had a relief cut in the bottom.
Try it in bypass mode. I’ve seen that Infinity inserts can interfere with the brake signal, causing weird error messages.
What if I have both red and green lights blinking rapidly. I just installed a new ridge combo blade so I am thinking it has to do something with that? Any suggestions>
Thanks!!!!
I just spent 2 hours trying to get a dado brake to register without error codes. So frustrating. Using a dewalt dado blade. Got it close with scraping a nickel on the top of the brake. Still got error code. I lowered the vertical bolts on the riving knife. It dropped maybe 1/32” and light went out. I thought I was good. Tilted blade to 45 and error came back on. Haven’t been able to get it fixed since. I’ve tried raising riving knife housing too. Nothing. I don’t know if it works to have it on with code flashing and then try and move brake or riving knife. I also always close the riving knife with lever down. My housing doesn’t flop around either.
I’ve moved the brake to where it’s touching the blade and backed off and no luck.
New brake. It’s a cb 52” 5hp single phase.
Regular brake works.
My 3 Freud (not Diablo) blades and an FS Tool 80T plywood blade all work without having to adjust the brake. Honestly, I’ve never had an error with any blade or dado cutter.
Well, except for cutting something conductive (had graphite on it) while not in bypass mode. I guess that was an error all right.