This is an FAQ For the SawStop Users’ Group on Facebook. It is in no way sponsored or approved by SawStop.
A lot of this information is available in the manual that came with your SawStop.
Group Etiquette
Make sure you answer the membership questions. If you don’t answer the questions then you don’t get admitted. Period.
If you live in a part of the world where SawStop isn’t sold, then contact me directly through Facebook. I understand that it’s possible for someone to buy a SawStop and then relocate to somewhere where they’re not sold, so if this is the case then you’ll need to provide some sort of proof that you have a SawStop before I’ll let you in.
Are you a part of the SawStop Sales or Marketing team? If so, go away. This group isn’t for you. It is neither a sales nor a marketing tool for you to take advantage of. The only SawStop employees that are allowed into this group are Service employees or those that are actual saw owners and users (as long as they aren’t in Sales or Marketing).
Do you represent a major saw retailer? If so, go away. See answer regarding SawStop Sales or Marketing team members.
Absolutely. A lot of the members of this group are prospective owners that are just waiting for a good deal on a used saw to come their way.
Yes, as long as it’s woodworking-related. Although the original intent for this group was to only discuss SawStop-related topics, our group admission policies have resulted in a very friendly environment with a large knowledge base to pull from.
Simple…be nice. There are, of course, other reasons to be removed from this group, but the number one reason people are kicked out is because of their attitudes. Other than that, it is extremely rare to be kicked out.
Once you are kicked out, however, it is a permanent ban. If you feel you were removed unjustly, then feel free to contact me. Don’t expect me to do anything about it, though. We have some really good moderators on this group and I’ve never reversed one of their decisions.
That jabroney is most likey me, and no, I’m definitely not mad. I am simply trying to stop the spread of misinformation.
I don’t expect the average user to be an expert on how the SawStop system works, but we all have a tendency to just latch onto some info we read somewhere and then it becomes part of our understanding. When someone else asks a group of us why they’re experiencing something strange, we give into our primal desire to be the one to solve the problem and dig into our stores of knowledge. That’s when I see the slight misunderstandings come out and spread.
If you see me correct you, it isn’t in any way a negative thing. Rather, it’s an opportunity to add to your understanding of what’s going on, making you a better resource for this group.
Electrical
Lower amperage. The typical amperage draw (under load) when hooked up to 120 volts is ~13 Amps, which drops down to ~7 Amps when hooked up to 220 volt power. What this means for you is that the motor will run cooler, get up to speed faster, and be much less likely to trip the breaker. This does not mean you’ll get more horsepower. It’ll possibly feel like there is more horsepower since you’ll be able to bog down the motor without it tripping the breaker as easily, but it’s still a 1.75 horsepower motor.
Whatever gauge your electrician tells you to use. It’s never a good idea to ask for electrical advice on the internet. Line voltage can kill you or burn down your house. Are you really willing to stand outside your burning home and turn to your spouse and say “But the internet told me…”
Seriously, line voltage is not complicated, but you really are in way over your head if you have to ask the internet for advice. There’s no shame in asking for help from an electrician.
Use a shorter/better extension cord. Or better yet, no extension cord at all. You are experiencing what is called “contactor chatter”. The contactor on the saw acts as a gate. Normally, the voltage from the wall comes into the saw, hits the contactor, and stops there since the gate is closed by default. When you pull the paddle, the contactor uses some of the voltage coming in to power up, which turns it into a magnet and then “opens the gate” and sends the remaining voltage to the motor.
Contactor chatter occurs when you have enough voltage to power the contactor, and you have enough voltage to power the motor, but not enough voltage to power them both at the same time. This drop in voltage is usually caused by an extension cord, but there is a slight chance it could be something like a bad circuit in the wall.
So, what happens is essentially this: you pull the paddle and the contactor pulls voltage to power itself up. When it does this, the gate opens and the rest of the voltage goes to the motor. Since there isn’t enough remaining voltage to adequately power the motor, it takes voltage from wherever it can find it, which is the contactor. This then powers off the contactor which in turn closes the gate. The result is that all of the voltage that was then going to the motor is now available again, and the contactor sees this and powers up again, which opens the gate again, which powers the motor again, which then steals voltage from the contactor again, which shuts off the motor again, and….you see where this is going.
This all happens really quickly and the rattling sound you are hearing is the sound of the contactor opening and closing repeatedly. The SawStop system will see that the blade isn’t spinning at proper speed after about a second and will then turn off the contactor and give you a “No blade rotation” error rather than continuing to try running the motor and damaging something.
Dust Collection
Most table saws recommend 400 CFM. Keep in mind that this means that there is 400 CFM at the table saw, not at the dust collector.
I used to set up dust collection systems for a living so I have some insight into this. The vast majority of the work I did wasn’t installing new systems, but rather, I was brought in to fix a system that someone had already thrown a lot of money at and were getting insufficient results from. That being said, here are some pointers…
Keep it simple. Most of the time, the systems I would fix consisted of an excellent dust collector hooked up to tools that were built well for dust collection, but the problem was what was in between the two. Keep the hoses and ducts as short as possible with as few 90-degree bends as you can and you should be fine. The best dust collection setup is a single 10′ hose going directly from the dust collector to the tool. It seems that most people want to incorporate branches and blast gates, but unless you have an overpowered dust collector, you’re just making your life more difficult in an attempt to make your life easier.
A Shop-Vac is not a dust collector. Shop-Vac’s lack the ability to provide enough CFM to do an adequate job at dust collection. They’re better than nothing at all, but not much better.
And while we’re at it, you don’t need to ground your dust collection system in an attempt to avoid a “dust explosion”. The science just doesn’t back it up. That being said, some people like to ground their dust hoses and ducts just to help eliminate static because it’s flat-out annoying. I won’t argue with you there.
It depends on your usage. Each has their pros and cons. Bigger isn’t always better and there are times where the Overarm Dust Collection (TSA-ODC) system will outperform the Floating Dust Collection (TSG-FDC) system.
1. The TSA-ODC automatically adjusts itself to the height of the material where the TSG-FDC needs to be manually adjusted.
2. The TSA-ODC is less expensive if you have a 3 HP or above saw which should have included the Dust Collecting Blade Guard (TSG-DC).
3. The TSA-ODC connects to your existing 4″ port on the back of the saw, whereas the TSG-FDC requires it’s own 4″ hose, either branching off from the back of the saw or branching off from the dust collector or your existing ductwork.
4. The TSA-ODC includes two pairs of anti-kickback pawls while the TSG-FDC is intended to be used with the riving knife which has no anti-kickback pawls.
5. The TSA-ODC works with the TSG-DC blade guard which consists of two halves that join in the middle, causing a visible seam right in line with the blade, whereas the TSG-FDC has a clear window that doesn’t obstruct the view of the blade.
In my own personal experience, they both perform about equally. I make stave drums which means I do a lot of bevel cuts. Any time I have the blade off of 90-degrees then I don’t like having anti-kickback pawls in the way since I feel like they get in my way more and can throw off my bevels. For this reason, I switched from the TSA-ODC to the TSG-FDC so I could use just the riving knife.
These days, I don’t use either, just the riving knife. That’s what works best for me.
Mobile Base
Everything’s fine. All SawStop mobile bases lift the saw higher on the right than on the left. This is to help balance the weight plus also lifting the extension table legs upward so they’re less likely to snag on a board or cables that may be on the shop floor. The downside to this is that the left side doesn’t raise up as much. In fact, if you add things to the left side, such as a router table or a sliding crosscut table, then they’ll most likely not raise up at all. If you keep adding things to the left then not only will they not raise up, but they’ll try to dig into the ground (I know this because I once attached a sliding crosscut table to a left-mounted router table as an experiment).
The way I personally deal with it is to raise the saw up, then go ot the router table or sliding crosscut table on the left and lift it ever-so-slightly as I move the saw around the shop.
There is a procedure in the mobile base manual that shows how to adjust this. It starts on page 3. It refers to adjusting the speed at which the saw lowers but it fixes this too as it’s essentially the same issue.
Saw Use
Use Bypass Mode to determine if the material is problematic. There is a video here that explains all about using Bypass Mode and using it to test your material.
Essentially, you’re going to put the saw into Bypass Mode, make your cut, and look at the lights on the switchbox before pushing the paddle back in. If the red light is flashing quickly, then what you cut would have activated the brake.
Contrary to popular belief, pressing the material against the side of the blade when the saw isn’t running isn’t an accurate way of testing conductivity of your material. This is for two reasons.
One is that the sensitivity of the brake cartridge is turned way down when the saw is sitting idle. As a result, it’s still looking for conductive material, it’s just not looking very hard. This means that if you press the material against the side of the blade and the red light starts to flash, then the material you are about to cut is definitely conductive enough to set off the brake. However, it doesn’t mean you’re in the clear if the red light doesn’t start flashing.
The other reason is that you’re only checking the outside of the material when you press it against the side of the blade. Wood dries from the outside-in, which means that any moisture present would be hiding at the center of the wood and won’t be detected by the blade until you actually start cutting.
You’re cutting something conductive. The saw is trying to give you a second chance to restart the saw in Bypass Mode. In other words, you’re getting close to activating the brake.
It varies by species. It can even vary by time of year and your location in the world. There really is no set answer. The saw will do it’s best to accommodate slightly wet wood, but it’s always best to play it safe and run the saw in Bypass Mode if you are in doubt.
This is totally normal. The sensitivity of the brake cartridge is turned down when the saw is sitting idle. This means that the saw should detect you if you touch the side of the blade and are making a lot of surface contact, but it won’t necessarily detect you if you just touch the tips of the carbides. The sensitivity is cranked all the way up when you start the saw so the brake will activate if you touch the tips of the carbides as the saw is running.
Brake Cartridges
No it didn’t. There is always a reason for the brake activating. Even in the extremely rare case of a bad brake cartridge, that’s still a reason. The best thing for you to do is to call SawStop Customer Service at (503)582-9934 and ask for an RMA to send in the brake to be analyzed. I also recommend working with the technician on the phone to see if you can figure it out without having to send in the brake.
Don’t worry about it. Hitting something as small as a nail shouldn’t trigger the brake. Now, if part of that nail is touching something that’s conductive, such as you or a metal fence on your miter gauge or something like that, it might be enough to activate the brake.
Very rarely. However, it depends on your definition of misfire.
The most common cause of a brake firing is skin contact. The second most common cause of the brake firing is user error, typically caused by hitting the fence on a fancy miter gauge. Other causes of user error are improper brake spacing and cutting material that is conductive enough to activate the brake. This does not count as a misfire. It’s actually misuse of the saw.
Other causes of brake activations can be electrical in nature, and quite often are caused by things outside the saw, and sometimes even completely out of your control, such as problems on your power grid or electrical interference from ham radio towers. This is what I would classify as a misfire, and they’re pretty rare. They do, however, need to be dealt with and the sooner the better. The best thing to do if your brake activates for unknown reasons is to call SawStop Service at (503)582-9934 and arrange to get the brake cartridge analyzed. In order to ensure that you get a good answer, I also recommend that you keep an open mind about the results.
Dadoes
Don’t use the washer. The industry standard is to not use the washer when using a dado stack that is ⅜” or wider. Personally, I always leave the washer off whenever I use more than one blade. The washer is just there to help stabilize a single blade and the blades will stabilize each other when you use more than one.
Here’s a list. There are some general guidelines that you should stick with.
1. Try to avoid anti-kickback shoulders.
2. Definitely avoid a stack with full-plate chippers.
No. The designer of the Miter Fold dado stack had to choose between making it smaller in diameter so it would be compatible with SawStop or larger so the end user could use it as a regular dado stack when they take out the special profile blade. They chose the latter.
No. The brake cartridge is sending out a signal to monitor the blade. As such, the aluminum brake pawl needs to be a certain distance from the blade in order to communicate. If you don’t change the brake, the system can’t talk to the blade and won’t let you start the saw, giving you a solid green and slow red.
Fence
Pull the fence handle towards you before you lock it down. This is common with all fences of this type. There is a gap between the front rail and the front tube (the part with the rulers on it). This channel is where the section of the fence that extends downward slides back and forth as you reposition the fence. Pulling the fence towards you keeps it square with the front rail.
You could also try repositioning the front tube a bit closer to the rail to help eliminate that gap but you’ll never get rid of it completely. If you did, it would be too tight to slide the fence back and forth comfortably.
Check the box that has the actual fence in it. That’s where both the rail hardware pack and the fence installation instructions are.
You may need to reposition your fence rails. If you look at the cast-iron table top and the cast iron wings, there should be a small chamfer running along the top-front edge. Make sure that the top of the rail rides right along the bottom edge of the chamfer.
There is no such chamfer on the back so just use a combination square to ensure that the top of the rail is about 1/16″ from the top of the cast-iron table all the way down the length.
Doing this will ensure that the rails are actually parallel with the table top and should keep the wooden extension table from being too low.
Blades
Just use the saw and the problem will fix itself. This is completely normal.
This is caused when they cut your table insert at the factory. First, they install a brand new insert without any slot cut in it. Then they start up the saw and carefully raise the blade all the way up then lower it all the way back down. This creates a “zero-clearance” insert, where the insert rubs on the blade on both the right and left. Next, they angle the blade to 45-degrees and again raise and lower the blade all the way. This ends up clearing out a little bit more material on the right, causing the insert to only rub on the left side. This gives the appearance that the blade is not centered in the insert opening, while not actually causing any problems.
No. The standard riving knife is actually thinner than a 3/32″ thin-kerf saw blade. Check out the following article for more info: https://www.trentdavis.net/wp/2019/10/23/thin-kerf-blades-and-riving-knives/
Yes. The minimum recommended blade is 3/32″.
Clean out your saw. The procedure is different depending on which model saw you are using.
JSS: (No video available)
CNS: https://youtu.be/CFOkEHOw_VM
PCS: https://youtu.be/D_6SwIawU7U
ICS: https://youtu.be/T29xKuHuGEk
Absolutely. The red coating that Freud uses doesn’t negatively affect the conductivity of the blade. The same goes for the yellow coating on Dewalt blades and the blue coating on Erwin blades.
They are bumps on the back of saw teeth, as shown in this image.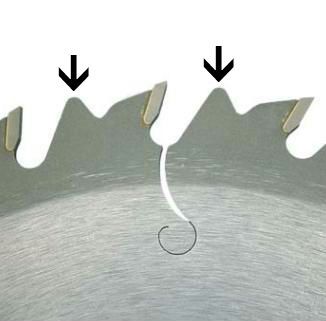
They can cause the brake to take longer to stop the blade in the event of a brake activation. The difference in time is minimal, but it can be the difference between a barely noticeable scratch on your finger, or needing stitches and a new pair of shorts.
At the end of the day, it’s not a huge issue. You’ll find many photos on the internet of activated brakes wrapped around a blade with anti-kickback shoulders. The blade will still stop, it’ll just take a little bit longer than normal.
You need to reset the arbor. You can watch a video about it here. This usually happens following a brake activation, but it can also happen with any sort of impact to the blade, such as wood binding or kickback.
This is normal if the blade wasn’t spinning at full speed when the brake activated. The blade drops below the table when the arbor comes unlocked. If the blade is spinning at full speed, it generates a lot of force when the aluminum brake pawl slams into it. However, if the blade is coasting down or otherwise not spinning very fast, there isn’t enough force to unlock the arbor so the blade may not drop. It also isn’t as noisy when this happens.
Table Top
Check out this video. Cast-iron is a very soft metal which can cause a bit of bowing on something like a long, skinny table saw wing. Fortunately, that same softness makes it relatively easy to fix.
The first thing to do is to ensure that you actually have a problem. Woodworking has its own set of tolerances. Since we’re not building the next space shuttle here, we don’t need NASA-level accuracy. We want our cuts to be straight. No one’s going to burn up on re-entry if they aren’t machinist-level quality.
The first step is to check just the main table without taking into account the extension wings. Using a quality straightedge, lay it on the table top going diagonally from one of the front corners to the opposite rear corner. If the straightedge rocks then you have a high spot in the middle. If it doesn’t rock but you can see some light under the straightedge then there is a low spot in the table.
Checking a high spot is different than checking a low spot. To check a high spot, you’re going to need two sets of feeler gauges, one for each end of the straightedge. Essentially, you’re going to balance the straightedge on the high spot and insert the feeler gauges under each end. When you get the feeler gauges to match and there is no light between the straightedge and the high spot, then you have the actual amount that your table is out.
For example, let’s say that you lay your straightedge on the table and you notice that it rocks. You grab your feeler gauges and find that you can insert a .015” gauge under the straightedge at the far end while pushing down at the opposite end. This is not accurate. What you do is balance the straightedge on the high spot while inserting feeler gauges under both ends at the same time. In this example, you would probably get something between .005” and .008”, which is within spec.
Honestly, the best test is to just make some cuts and see how they turn out.
Follow this procedure: https://youtu.be/xaDJC-mo9LQ
No. The saw doesn’t need to be level, just flat. The only time where being level really comes into play, if at all, is when you want your saw to interact with another item in your shop, such as an outfeed table. Even then, it usually doesn’t matter.
Trent,
Thanks for the valuable information… it seems like the cast extension wings are not lining up with the main saw body. What is a fix for something like this please?
Rich
Check this out…
https://youtu.be/sZY90QnIPZI
I want a SawShop hat
Well this was a long morning read.I learned a few new things . Nice to know I’m not going to burn up in reentry just because there’s a slight drop off in the middle of my wings, but I have considered building a space craft if life ever gets too overbearing..